

Solution
Before Replacing the Toner CartridgeReplacing the Toner Cartridge
Precautions on Replacing the Toner Cartridge
Caution
A warning message does not appear on your computer even if the toner cartridge is reaching its lifetime. The case where white streaks appear on printed paper in longitudinal direction, or printed paper comes out faint or uneven can be used to estimate when the toner cartridge will need to be replaced. When you are replacing the toner cartridge, be sure to use a genuine Canon toner cartridge designed for this printer.
Caution
- Replacement toner cartridge: 1,500 sheets
- Toner cartridge included with this printer: 700 sheets
The above average yields are on the basis of "ISO/IEC 19752"* when printing A4 size plain paper with the default print density setting.
* "ISO/IEC 19752" is the global standard related to "Method for the determination of toner cartridge yield for monochromatic electrophotographic printers and multi-function devices that may contain printer components" issued by ISO (International Organization for Standardization).
- Printing environment/Printing condition
Intermittent printing
Settings for the paper size and paper type
- Printing ratio
Toner is consumed even when printing is performed with a low printing ratio.
Before Replacing the Toner Cartridge
Toner cartridges are consumable products. If toner is not sufficient, the following symptoms occur.
If this type of symptom occurs, perform the following procedure before replacing the toner cartridge. You may be able to print for a while until the toner is used up completely.
1. Open the top cover.
Place your finger in the groove on the top cover and open.
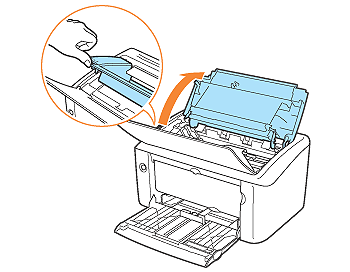
2. Remove the toner cartridge from the printer.

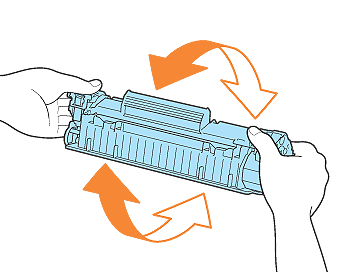
3. Hold the toner cartridge as shown in the figure and shake it gently 5 or 6 times to evenly distribute the toner inside the cartridge.
Caution
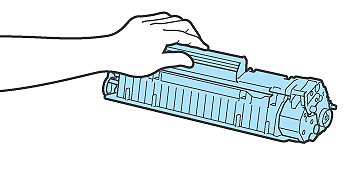
4. Hold the toner cartridge properly as shown in the figure.
5. Install the toner cartridge.
Push the toner cartridge into the printer firmly until it touches the back of the printer while aligning projections on both sides of the toner cartridge with the toner cartridge guides inside the printer.

6. Close the top cover.

If the print is too thin even after performing the procedure above, replace the toner cartridge with a new one.
Replacing the Toner Cartridge
1. Open the top cover.
Place your finger in the groove on the top cover and open.
2. Remove the toner cartridge from the printer.
3. Take the new toner cartridge out of the box.
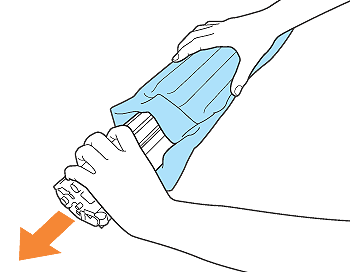
4. Take the toner cartridge out of the protective bag.
you can open the protective bag by hand.
When opening the protective bag with scissors, be careful not to damage the toner cartridge.
5. Hold the toner cartridge as shown in the figure and shake it gently 5 or 6 times to evenly distribute the toner inside the cartridge.
Caution
6. Place the toner cartridge on a flat surface.
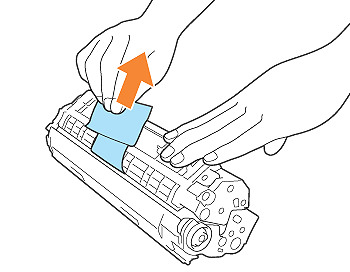
7. Remove the drum protective sheet.
Gently pull out the drum protective sheet in the direction of the arrow.
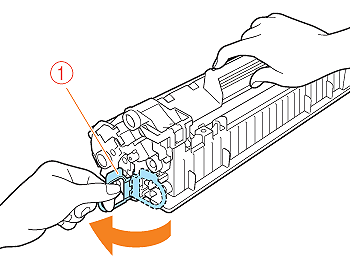
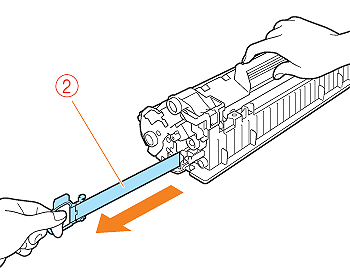
8. Pull out the sealing tape.
Grab the tab with your finger and pull it (1).
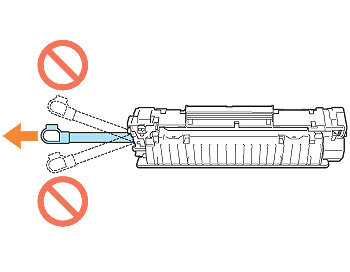
Gently pull out the sealing tape (approx. 50 cm long) straight in the direction of the arrow while supporting the toner cartridge (2).
Caution
9. Hold the toner cartridge properly as shown in the figure.
10. Install the toner cartridge.
Push the toner cartridge into the printer firmly until it touches the back of the printer while aligning projections on both sides of the toner cartridge with the toner cartridge guides inside the printer.
11. Close the top cover.
Precautions on Replacing the Toner Cartridge

Canon has confirmed that counterfeit toner cartridges are sold in the market.
Using a counterfeit toner cartridge may cause poor print quality or poor printer performance. Please be advised that Canon owes no liability for any malfunction, accidents or damage caused by using non-genuine toner cartridges including counterfeits.
For details, see the following website.
Caution
Caution