Canon Group
Close Close
Menu Menu Close Close Search
PIXMA MX410 Support
FAQ and troubleshooting

Paper Does Not Feed Properly

Content Id: 8200994000


Issue

Cause and solution

Check 1: Make sure of the following when you load paper

When loading two or more sheets of paper, flip through the paper before loading.

When loading two or more sheets of paper, align the edges of the sheets before loading.
When loading two or more sheets of paper, make sure that the paper stack does not exceed the paper load limit. However, proper feeding of paper may not be possible at this maximum capacity depending on the type of paper or environmental conditions (either very high or low temperature and humidity). In such cases, reduce the sheets of paper you load at a time to less than half of the paper load limit.
Always load the paper in portrait orientation, regardless of the printing orientation.
When you load the paper on the Rear Tray, load the paper with the print side facing UP and slide the Paper Guides to align with the both sides of the paper.

Loading Plain Paper / Photo Paper

Caution

If you cut plain paper into small size such as 4" x 6" / 10 x 15 cm, 4" x 8" / 101.6 x 203.2 mm, 5" x 7" / 13 x 18 cm, or 2.16" x 3.58" / 55.0 x 91.0 mm (Card size) to perform trial print, it can cause paper jams.

Caution

We recommend Canon genuine photo paper for printing photos. For details on the Canon genuine paper, see [ Media Types You Can Use ].
You can use general copy paper. For the page size and paper weight you can use for this machine, see [ Media Types You Can Use ].

1. Prepare paper.

Align the edges of paper. If paper is curled, flatten it.
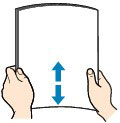
Caution

Align the edges of paper neatly before loading. Loading paper without aligning the edges may cause paper jams.
If paper is curled, hold the curled corners and gently bend them in the opposite direction until the paper becomes completely flat.

-⋗ [ Paper Is Smudged/Printed Surface Is Scratched ]

2. Load paper.

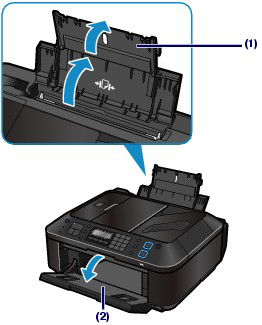
(1) Open the Paper Support, and open the support as an extension.

(2) Open the Paper Output Tray gently.

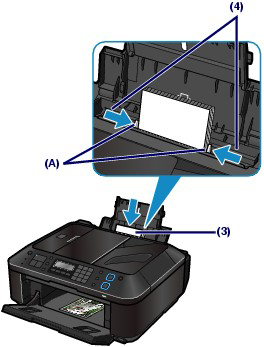
(3) Slide the Paper Guides (A) to open them, and load the paper in the center of the Rear Tray WITH THE PRINT SIDE FACING YOU.

(4) Slide the Paper Guides (A) to align them with both sides of the paper stack.

Do not slide the Paper Guides too hard. The paper may not be fed properly.

Caution

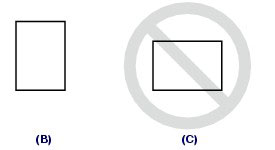
Always load paper in the portrait orientation (B). Loading paper in the landscape orientation (C) can cause paper jams.

Caution

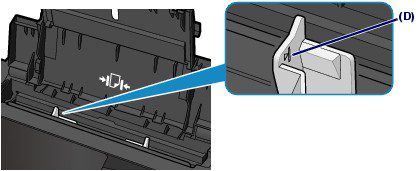
Do not load sheets of paper higher than the Load Limit Mark (D).

Caution

The machine may make an operating noise when feeding paper.

After loading paper

When using the machine to copy without a computer, select the size and type of the loaded paper for Page size and Media type of the setting options.

See [ Changing the Settings ]

When printing with a computer, select the size and type of the loaded paper in Printer Paper Size and Media Type in the printer driver.

See [ Printing from Your Computer ]

Loading Originals in the ADF

You can load documents to copy, fax, or scan in the ADF.

Caution

To scan a document at optimum quality, load it on the Platen Glass.

1. Make sure that any original has been removed from the Platen Glass.

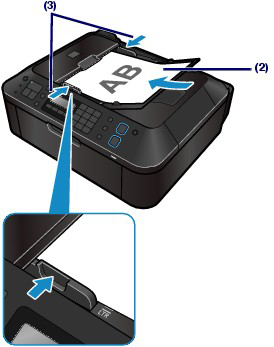
2. Load a document in the ADF.

(1) Open the Document Tray.

(2) Insert the document in the Document Tray until you hear a beep sound.

Load the document WITH THE SIDE TO SCAN FACING UP in the Document Tray.

Caution

When you set the alarm to be silent in Device user settings of Device settings, the alarm will not beep even if the document is inserted in the Document Tray.

(3) Adjust the Document Guides to match the width of the document.

Do not slide the Document Guides too hard. The document may not be fed properly.
Loading Paper

Cause and solution

Check 2: Check to see if the paper you are printing on is not too thick or curled

Do not use the following types of paper. Using such paper will cause not only unsatisfactory results, but also the machine to jam or malfunction.

Folded, curled, or wrinkled paper
Damp paper
Paper that is too thin (weighing less than 17 lb / 64 g/m2)
Paper that is too thick (weighing more than 28 lb / 105 g/m2, except for Canon genuine paper)
Paper thinner than a postcard, including plain paper or notepad paper cut to a small size (when printing on paper smaller than A5)
Picture postcards
Postcards affixed with photos or stickers
Envelopes with a double flap (or sticker flaps)
Envelopes with an embossed or treated surface
Envelopes whose gummed flaps are already moistened and adhesive
Any type of paper with holes
Paper that is not rectangular
Paper bound with staples or glue
Paper with adhesives
Paper decorated with glitter, etc.
Media Types You Cannot Use

Loading Plain Paper / Photo Paper

Caution

If you cut plain paper into small size such as 4" x 6" / 10 x 15 cm, 4" x 8" / 101.6 x 203.2 mm, 5" x 7" / 13 x 18 cm, or 2.16" x 3.58" / 55.0 x 91.0 mm (Card size) to perform trial print, it can cause paper jams.

Caution

We recommend Canon genuine photo paper for printing photos. For details on the Canon genuine paper, see [ Media Types You Can Use ].
You can use general copy paper. For the page size and paper weight you can use for this machine, see [ Media Types You Can Use ].

1. Prepare paper.

Align the edges of paper. If paper is curled, flatten it.

Caution

Align the edges of paper neatly before loading. Loading paper without aligning the edges may cause paper jams.
If paper is curled, hold the curled corners and gently bend them in the opposite direction until the paper becomes completely flat.

-⋗ [ Paper Is Smudged/Printed Surface Is Scratched ]

2. Load paper.

(1) Open the Paper Support, and open the support as an extension.

(2) Open the Paper Output Tray gently.

(3) Slide the Paper Guides (A) to open them, and load the paper in the center of the Rear Tray WITH THE PRINT SIDE FACING YOU.

(4) Slide the Paper Guides (A) to align them with both sides of the paper stack.

Do not slide the Paper Guides too hard. The paper may not be fed properly.

Caution

Always load paper in the portrait orientation (B). Loading paper in the landscape orientation (C) can cause paper jams.

Caution

Do not load sheets of paper higher than the Load Limit Mark (D).

Caution

The machine may make an operating noise when feeding paper.

After loading paper

When using the machine to copy without a computer, select the size and type of the loaded paper for Page size and Media type of the setting options.

See [ Changing the Settings ]

When printing with a computer, select the size and type of the loaded paper in Printer Paper Size and Media Type in the printer driver.

See [ Printing from Your Computer ]

Loading Originals in the ADF

You can load documents to copy, fax, or scan in the ADF.

Caution

To scan a document at optimum quality, load it on the Platen Glass.

1. Make sure that any original has been removed from the Platen Glass.

2. Load a document in the ADF.

(1) Open the Document Tray.

(2) Insert the document in the Document Tray until you hear a beep sound.

Load the document WITH THE SIDE TO SCAN FACING UP in the Document Tray.

Caution

When you set the alarm to be silent in Device user settings of Device settings, the alarm will not beep even if the document is inserted in the Document Tray.

(3) Adjust the Document Guides to match the width of the document.

Do not slide the Document Guides too hard. The document may not be fed properly.

Loading Paper

Cause and solution

Check 3: Make sure of the following when you load envelopes

When printing on envelopes, refer to [ Loading Envelopes ], and prepare the envelopes before printing.

Once you have prepared the envelopes, load them in portrait orientation. If the envelopes are placed in landscape orientation, they will not feed properly.

Cause and solution

Check 4: Make sure that there are not any foreign objects in the Rear Tray

If the paper tears in the Rear Tray, see [ Paper Jams ] to remove it.

If there are any foreign objects in the Rear Tray, be sure to turn off the machine, unplug it from the power supply, then remove the foreign object.

Cause and solution

Check 5: Clean the Paper Feed Roller

Caution

Cleaning the Paper Feed Roller will wear the roller, so perform this procedure only when necessary.

If the Paper Feed Roller is dirty or paper powder is attached to it, paper may not be fed properly.

In this case, clean the Paper Feed Roller. Cleaning will wear out the Paper Feed Roller, so perform this only when necessary.

You need to prepare: three sheets of A4 or Letter-sized plain paper

1. Make sure that the power is turned on, and remove any paper in the Rear Tray.

2. Open the Paper Output Tray gently.

3. Clean the Paper Feed Roller without paper.

(1) Press the Menu button repeatedly until Maintenance appears.

(2) Use the (-) or (+) button to select Roller cleaning, and press the OK button.

The Paper Feed Roller will rotate as it is cleaned.

4. Clean the Paper Feed Roller with paper.

(1) Make sure that the Paper Feed Roller stops rotating, and load three or more sheets of A4 or Letter-sized plain paper in the Rear Tray.

(2) Repeat the procedures in step 3.

The machine starts cleaning. The cleaning will be completed after the paper is ejected.

If the problem is not resolved after cleaning the Paper Feed Roller, contact the service center.

Cleaning the Paper Feed Roller
"Was this helpful?"