

Preparing the Printer Sharing Settings
Caution
The screenshots used in this section are from Windows XP Professional.
1. Perform the following procedure.

From the [Start] menu, select [Settings] ⋗ [Network and Dial-up Connections].

From the [Start] menu, select [Control Panel], and then click [Network and Internet Connections] ⋗ [Network Connections].

From the [Start] menu, select [Control Panel] ⋗ [Network Connections] ⋗ [Local Area Connection], click [Properties], and then proceed to Step 3.

From the [Start] menu, select [Control Panel], and then click [View network status and tasks] ⋗ [Manage network connections].
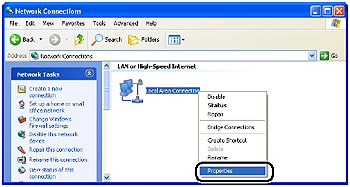
2. Right-click the [Local Area Connection] icon, then select [Properties] from the pop-up menu.
Caution
If you are using Windows Vista and the [User Account Control] dialog box appears, click [Continue].
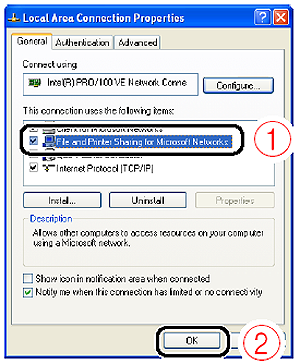
3. Make sure that [File and Printers Sharing for Microsoft Networks] is selected (1), then click [OK] (2).
Printer Sharing Settings
Printer sharing settings vary depending on your operating system. See the following setting procedure according to your operating system.
Caution
If you are not sure whether you are using 32-bit Windows Vista or 64-bit Windows Vista, see [Checking the Processor Version of Windows Vista].

Caution
For Windows XP, the printer cannot be shared on a network at the default settings (the settings immediately after the installation).
Printer sharing settings require running [Network Setup Wizard] to enable the sharing settings.
For more details, see Windows Help.
1. Display the [Printers and Faxes] folder or the [Printers] folder.
From the [Start] menu, select [Settings] ⋗ [Printers].

From the [Start] menu, select [Printers and Faxes].

From the [Start] menu, select [Control Panel], and then click [Printers and Other Hardware] ⋗ [Printers and Faxes].
From the [Start] menu, select [Control Panel], and then click [Printer].
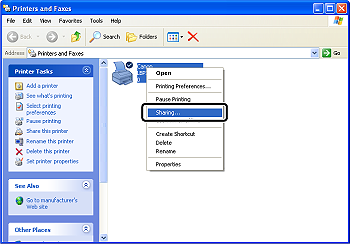
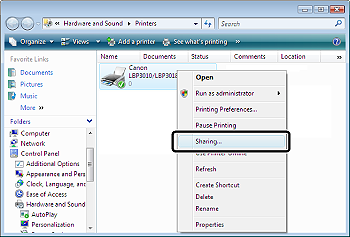
2. Right-click the icon for this printer, then select [Sharing] from the pop-up menu.
Caution
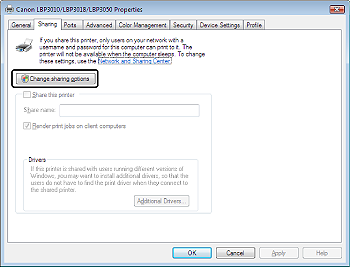
If you are using Windows Vista and [Change sharing options] appears, click [Change sharing options].

If the [User Account Control] dialog box appears, click [Continue].
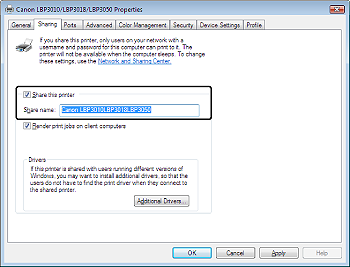
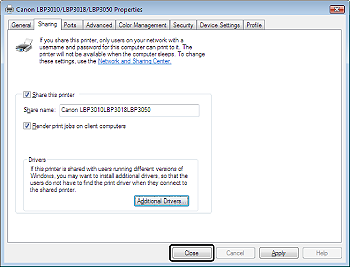
3. Perform the following procedure.
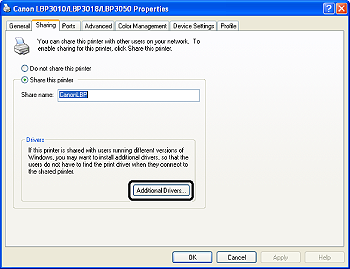
Select [Shared as]. Change the share name as needed.
Select [Share this printer]. Change the share name as needed.
Select the [Share this printer] check box. Change the share name as needed.
Proceed to the following procedure according to your operating system or environment.
| For Windows XP (SP2 or later)/Server 2003 (SP1 or later)/Vista | For an operating system other than specified in the left column | |
| If any clients are using a 64-bit operating system | If no client is using a 64-bit operating system | Proceed to Step 10. |
| Proceed to Step 4. | Proceed to Step 10. | |

Caution
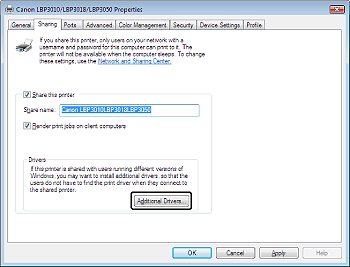
4. Click [Additional Drivers].
Caution
If you want to update the additional driver (alternate driver), perform the following procedure.
1. Uninstall the printer driver used in the print server. [Uninstalling the Printer Driver]
2. Install the new printer driver on the print server. [Installing the Printer Driver]
3. Install the additional driver again.
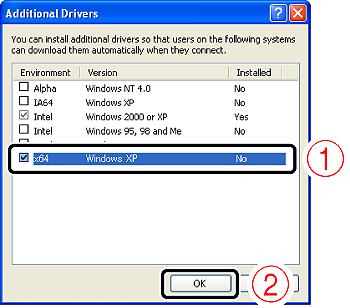
5. Select the [x64] check box (1), then click [OK] (2).
6. Insert the "LBP3010/LBP3018/LBP3050 (or LBP3100/LBP3108/LBP3150) User Software" CD-ROM supplied with the printer into the CD-ROM drive, and then click [Browse].
If CD-ROM Setup appears, click [Exit].
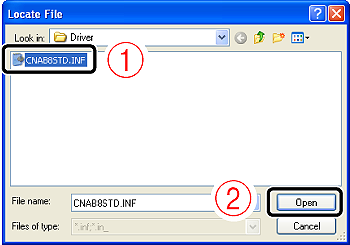
7. Open the folder in the supplied CD-ROM: [English] - [x64] - [Driver].
8. Select [CNAB8STD.INF] (or [CNAB9STD.INF]) (1), then click [Open] (2).
9. Click [OK].
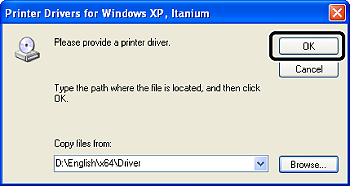
Copying files is started.
You can take the CD-ROM out of the CD-ROM drive after copying files is completed.
10. Click [Close] or [OK].
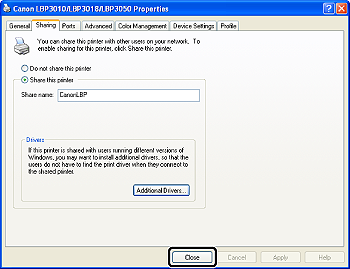
The printer icon changes to the shared printer icon.

Caution
To clear the printer sharing settings, use the following procedures.
* If [Change sharing options] appears, click [Change sharing options]. If the [User Account Control] dialog box appears, click [Continue].
Caution
For Windows XP, the printer cannot be shared on a network at the default settings (the settings immediately after the installation).
Printer sharing settings require running [Network Setup Wizard] to enable the sharing settings.
For more details, see Windows Help.
1. Display the [Printers] folder or the [Printers and Faxes] folder.
From the [Start] menu, select [Printers and Faxes].
From the [Start] menu, select [Control Panel], and then click [Printer].
2. Right-click the icon for this printer, then select [Sharing] from the pop-up menu.
Caution
If you are using Windows Vista and [Change sharing options] appears, click [Change sharing options].
If the [User Account Control] dialog box appears, click [Continue].
3. Perform the following procedure.
Select [Share this printer]. Change the share name as needed.
Select the [Share this printer] check box. Change the share name as needed.
Proceed to the following procedure according to clients' operating systems.
| If any clients are using 32-bit Windows XP (SP2 or later)/Server 2003 (SP1 or later) | For an operating system other than specified in the left column |
| Proceed to Step 4. | Proceed to Step 10. |
Caution
4. Click [Additional Drivers].
Caution
If you want to update the additional driver (alternate driver), perform the following procedure.
1. Uninstall the printer driver used in the print server. [Uninstalling the Printer Driver]
2. Install the new printer driver on the print server. [Installing the Printer Driver]
3. Install the additional driver again.
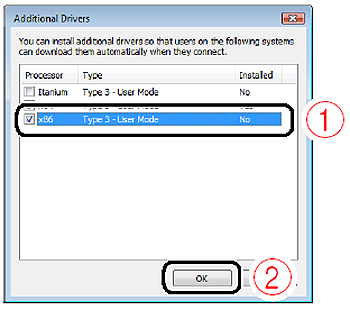
5. Perform the following procedure.
Select the [Windows 2000, Windows XP and Windows Server 2003] check box in the [Version] column (1), then click [OK] (2).
Select the [x86] check box in the [Processor] column (1), then click [OK] (2).
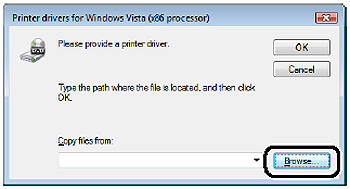
6. Insert the "LBP3010/LBP3018/LBP3050 (or LBP3100/LBP3108/LBP3150) User Software" CD-ROM supplied with the printer into the CD-ROM drive, and then click [Browse].
If CD-ROM Setup appears, click [Exit].
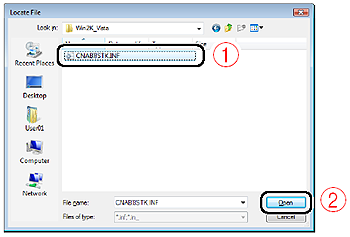
7. Open the folder in the supplied CD-ROM: [English] - [32bit] - [Win2K_Vista].
8. Select [CNAB8STK.INF] (or [CNAB9STK.INF]) (1), then click [Open] (2).
9. Click [OK].
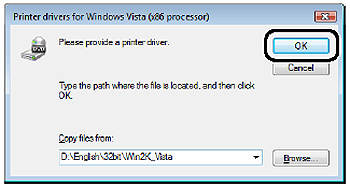
Copying files is started.
You can take the CD-ROM out of the CD-ROM drive after copying files is completed.
10. Click [Close] or [OK].
The printer icon changes to the shared printer icon.

Caution
To clear the printer sharing settings, use the following procedures.
* If [Change sharing options] appears, click [Change sharing options]. If the [User Account Control] dialog box appears, click [Continue].