

This section explains how to set the date and time of the camcorder.
Caution
The menus and setting options may differ depending on the model you use.
First Time Settings
You will need to set the date and time of the camcorder before you can start using it. The [Date/Time] screen will appear automatically when the camcorder’s clock is not set.
1. Turn on the camcorder.

2. Setting the Date and Time.
2-1. Touch a field you want to change (year, month, day, hours or minutes). Touch [ 

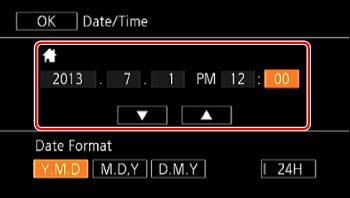
2-2. Touch [Y.M.D], [M.D,Y] or [D.M.Y] to select the date format you prefer.
3. Touch [ OK ].
Changing the Date/Time settings
1. Set the mode switch to ⋖M⋗ or ⋖CINEMA⋗.

2. Set the power switch to ⋖CAMERA⋗.
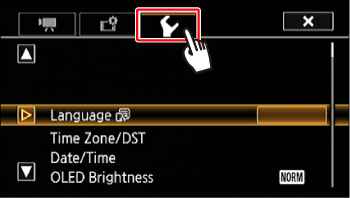
3. Touch [ 

4. Touch [ 

5. Touch [ 
6. 

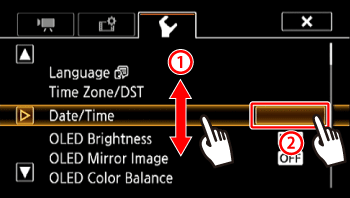
7. Setting the Date and Time.
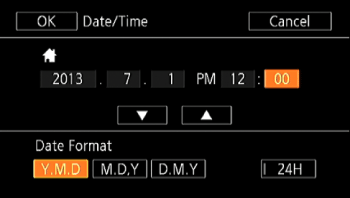
7-1. Touch a field you want to change (year, month, day, hours or minutes). Touch [
Set the correct date and time by changing all the fields in the same way.
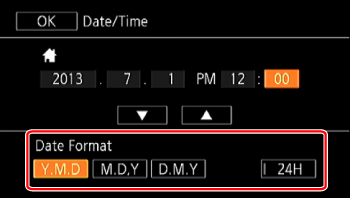
7-2. Touch [Y.M.D], [M.D,Y] or [D.M.Y] to select the date format you prefer.
7-3. Touch [OK] to start the clock and close the setup screen.
8. Touch [ 
Caution
When you do not use the camcorder for about 3 months, the built-in rechargeable lithium battery may discharge completely and the date and time setting may be lost. In such case, recharge the built-in lithium battery and set the time zone, date and time again.
Changing the Time Zone
Change the time zone to match your location. The default setting is New York. In addition, the camcorder is able to retain the date and time of an additional location. This is convenient when you travel so that you can set the camcorder to match the time of your home location or that of your travel destination.
1. Touch [

2. Touch [
3. Touch [
4.
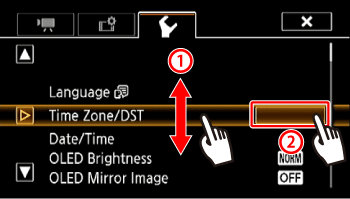
5. Touch [ 


6. Touch [ 
7. Touch [
Caution
When you return home after traveling, touch [