Canon Group
Close Close
Menu Menu Close Close Search
EOS 5D Mark III Support
FAQ and troubleshooting

Changing the size of still images before saving (exporting) them using ImageBrowser EX

Content Id: 8201545900


Solution

These instructions show how to change the size of images using the supplied [ImageBrowser EX] software.

To change the size of the images, use the [Email Settings] in the [E-mail Images] function.

Caution

The operations described here assume that the ImageBrowser EX software from the supplied CD-ROM (EOS DIGITAL Solution Disk) has been installed, and has been updated over the Internet.
If [ImageBrowser EX] was not included on the supplied CD-ROM, or if a CD-ROM was not included with your camera, you can download and install the [ImageBrowser EX] updater from the downloads section of the Canon Web site. Please note that you will need to have your camera ready when you do the installation.
In this section, Windows 7 is used as an example. Depending on the operating system you are using, on-screen displays and operations may differ slightly.

1. Double-click the [ImageBrowser EX] shortcut icon on your desktop to start [ImageBrowser EX].

If you cannot find the [ImageBrowser EX] shortcut icon on your desktop, click [Start] ⋗ [All Programs] or [Programs] ⋗ [Canon Utilities] ⋗ [ImageBrowser EX] and select [ImageBrowser EX] to start [ImageBrowser EX].


Caution

On a Mac, click the [ImageBrowser EX] icon on the [Dock]. If no [ImageBrowser EX] icon is found on the [Dock], click [Go] on the menu bar, select [Applications], and then open [Canon Utility] ⋗ [ImageBrowser EX], and then select and start [ImageBrowser EX].

2. Once [ImageBrowser EX] starts, click the images you want to change the size of to select them.

To select multiple images, click the images while holding down the ⋖Ctrl⋗* key.

* In Mac OS X, hold down the ⋖Command⋗ key while clicking images.
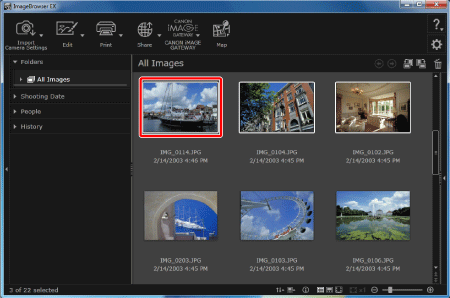
To select a series of images that are lined up in a row, click the first image, and then hold down the ⋖Shift⋗ key while you click the last image.


3. Click [Share], and then click [E-mail Images].
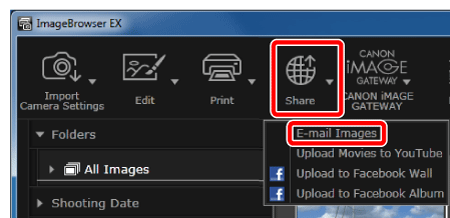

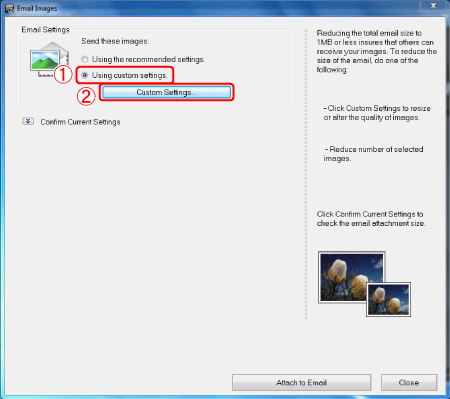
4. The [Email Images] window will appear.

Select [Using custom settings], and then click [Custom Settings].


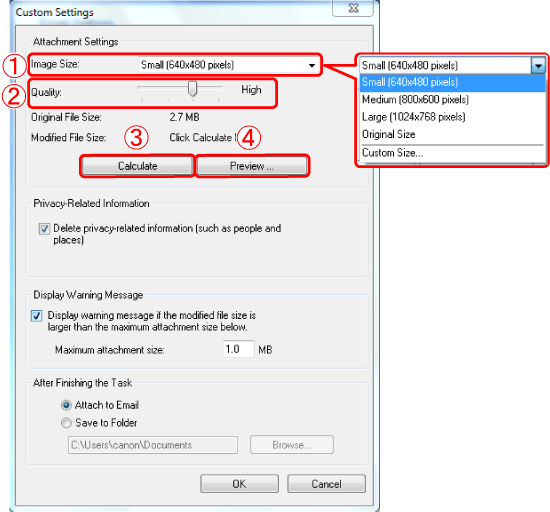
5. The [Custom Settings] screen will appear. Make settings as necessary for things like the image size and image quality.

Set the image size. If you select [Custom Size...], you can specify the number of pixels for the image size.
Adjust the image quality.
If you click , the modified file size will be shown in [Modified File Size].
A preview of the modified image will be shown.

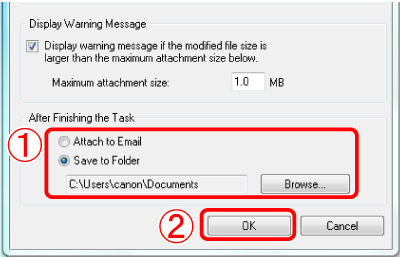
6. Select [Save to Folder], and then click [Browse...] to set a destination. Next, click [OK].


7. The following screen will appear. If you click [Save to Folder], the images will be saved to the destination you specified in step 6.
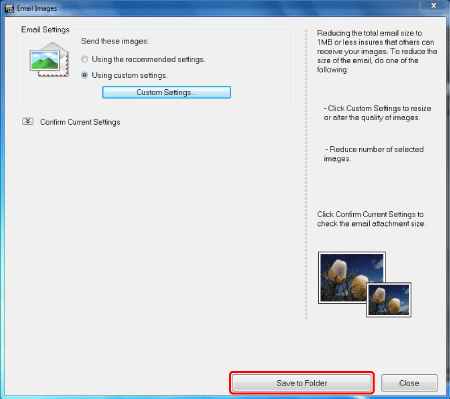

This completes the procedure for changing the size of images.

"Was this helpful?"