


The machine's IPv4 address can be either assigned automatically by a dynamic IP addressing protocol, such as DHCP, or entered manually. When connecting the machine to a wired LAN, make sure that the connectors of the LAN cable are firmly inserted into the ports. You can test the network connection if necessary.
Setting IPv4 Address
1. Select ⋖Menu⋗ in the Home screen.
2. Select ⋖Preferences⋗ 
3. Select ⋖TCP/IP Settings⋗
4. Configure IP address settings.
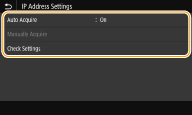
⋖Auto Acquire⋗
Select to automatically assign an IP address via DHCP protocol. When ⋖On⋗ is displayed, automatic addressing is enabled.
⋖Manually Acquire⋗
Select to configure the IP address settings by manually entering an IP address. In order to select this option, the automatic acquirement must be set to ⋖Off⋗.
⋖Check Settings⋗
Select when you want to view the current IP address settings.

4-A-1. Select ⋖Auto Acquire⋗.
4-A-2. Select the protocol.
Touch panel model
⋖DHCP⋗.Black and white LCD model
⋖DHCP⋗.Caution
If you do not want to use DHCP/BOOTP/RARP to assign an IP address
4-A-3. Check that ⋖Auto IP⋗ is set to ⋖On⋗.
4-A-4. Select ⋖Apply⋗.
Caution
4-B-1. Configure a setting to disable auto-acquisition.
Touch panel model
⋖Apply⋗.Black and white LCD model
4-B-2. Select ⋖Manually Acquire⋗.
4-B-3. Specify the IP address, subnet mask, and gateway address (or default gateway).
Touch panel model
Black and white LCD model
 .
.5. For the touch panel model, select ⋖OK⋗.
6. Restart the machine.
Caution
Checking whether the settings are correct
When you have changed the IP address after installing the printer driver
Testing the Network Connection
1. Select ⋖Menu⋗ in the Home screen.
2. Select ⋖Preferences⋗
3. Select ⋖TCP/IP Settings⋗
4. Enter the IPv4 address of another device on the network, and press ⋖Apply⋗ (
