

Solution
With the supplied software Photo Application you can save photos to your computer.For details, see the relevant sections in the [Photo Application Instruction Manual (PDF file)] in the [MANUALS_ENGLISH] folder on the supplied Camcorder Supplemental Disc.
Caution
Install the software before you connect the camcorder to the computer for the first time. For the second or subsequent time, simply connect the camcorder to the computer.
1. Install the supplied Photo Application software following the instructions in the software’s instruction manual.
2. Power the camcorder using the compact power adapter.
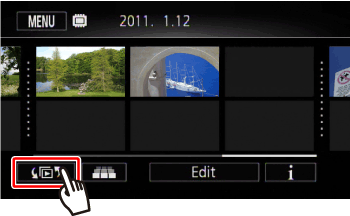
3. Press ⋖
4. Switch to the screen that displays the photos you wish to save.
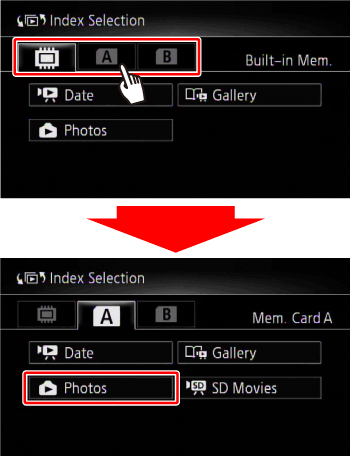
Open the index screen of the built-in memory, memory card A, or memory card B.
4-1. Touch [ 
4-2. Select the memory where the photos are saved, and then touch [Photos].
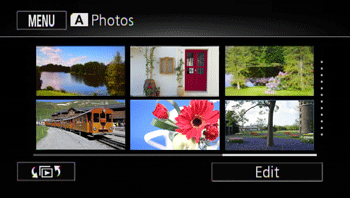
4-3. The [Photos] index screen appears.
5. Connect the camcorder to the computer using the supplied USB cable.
Caution
Start CameraWindow on the computer.
CameraWindow will be opened automatically.
6. Save the photos to the computer using CameraWindow.
For details of the procedures, see the [Saving Photos on the computer] section in the Photo Application Instruction Manual.
Caution
- Do not open the double memory card slot cover and do not remove the memory cards.
- Do not access, change or delete any of the camcorder’s folders or files directly from the computer as this may result in permanent data loss. Always save your movies on the computer, and restore files to the camcorder, using only the supplied PIXELA’s software.
- Do not open the double memory card slot cover.
- Do not disconnect the USB cable.
- Do not turn off the camcorder or the computer.
- Do not change the camcorder’s operating mode.
Caution
 mode, the process of creating scene thumbnails will start automatically. If your intention was to save photos to the computer, you can touch [Skip] to stop the process and use the computer’s Safely Remove Hardware function (Windows) or Eject function (Mac OS) to end the connection to the camcorder. Disconnect the USB cable, set the camcorder to
  mode and restore the connection.